Lecture 7 - More on Conditionals
Overview, Objectives, and Key Terms
In Lecture 5, the basics of programming
logic were introduced, including the idea of selection. In Lecture
6, those concepts were put into practice in
Python using the if, elif, and else structure. In this
lesson, we dive into more complicated use cases, focusing on nested
conditionals and the more complex code resulting from such conditionals.
Along the way, we’ll apply the graphical debugger in Spyder to help
understand the flow of execution (and to catch bugs!).
Objectives
By the end of this lesson, you should be able to
- Read and write nested
ifstatements - Explain the difference between syntactical and logical errors
- Use the graphical debugger in Spyder to trace and debug a program
Key Terms
- nested conditional
- bug
- debugger
- breakpoint
- syntactical error
- logical error
- trace code
Motivating Nested Conditionals - Life Insurance
Life insurance is one of those things that should be on your radar within the next ten years. Although such insurance comes in various forms, a popular modality is term life insurance, for which you pay a fixed monthly (or annual) premium over the period (term) of coverage. Common terms are 10, 20, and 30 years. The cost of a policy depends on several factors. The premium is larger for plans with a larger payout and for plans with longer terms. Of course, one expects to pay more in total for a longer period, but the increased premium of longer terms accounts for the increased risk of your demise with age—macabre, surely, but understandable. Two other important factors are one’s present age and, in most states, one’s sex. Older individuals purchasing a plan are viewed as higher risks than younger individuals, all else equal. Likewise, females are lower risks than males, all else equal, because they tend to live longer (expected lifetimes of 82 and 77 years, respectively, says WHO).
The table below shows some representative annual premiums for males and females of different ages for a $100,000 plan. Assume that the age indicates the upper limit for the values listed in a given row; in other words, a 29-year old male seeking a 10-year plan will pay $84/year, whereas a 34-year old female would pay $125/year for a 20-year plan. Notice, neither males nor females are able to acquire a 30-year term policy if they are already 60 years in age.
| Term | Age | Premium ($, male) | Premium ($, female) |
|---|---|---|---|
| 10 | 30 | 84 | 81 |
| 10 | 40 | 99 | 94 |
| 10 | 50 | 168 | 151 |
| 10 | 60 | 330 | 277 |
| 20 | 30 | 111 | 101 |
| 20 | 40 | 131 | 125 |
| 20 | 50 | 270 | 225 |
| 20 | 60 | 639 | 466 |
| 30 | 30 | 148 | 124 |
| 30 | 40 | 205 | 169 |
| 30 | 50 | 405 | 317 |
| 30 | 60 | n/a | n/a |
With this data, we can now motivate nested conditionals with the simple question: define an algorithm for computing one’s premium based on this data. Surely, it’s easy for us all to look at the table and do some mental math, but just as was emphasized in Lecture 5, instructions must be very specific if a computer is to be expected to complete a task.
For this problem, there are three implicit levels of selection: the
premium depends on term, age, and sex. Selecting between the
options in any category is easy with the if, elif, and else
construct, but how do we select between options in two categories?
Three?
The answer is by using a nested conditional. For simplicity, let’s limit our attention to 10-year plans. To compute our premium therefore requires our age and sex. Here’s a start to our solution:
age = int(input('input age: '))
sex = input('input sex: ')
premium = None
if age < 30:
    pass # next handle male or female
elif age < 40:
    pass # next handle male or female
elif age < 50:
    pass # next handle male or female
elif age < 60:
    pass # next handle male or female
else:
    print('Hmm, maybe call an agent?')
print('Annual premium is', premium)
Notice, for ages 60 or higher, a message is printed because no data exists for that age range.
Now, for each age range, pass was used as a “place holder.” It’s
useful in practice to sketch out some features of a program before
filling out all the details. Here, the age selection is implemented, but
nothing is done yet about sex (although I’ve helpfully left some
comments to myself as a reminder). If the age provided to the program
were 35, then we know that there are two possible values for the
premium: 125 for females and 131 for males. That’s a simple
if/else decision whose form in Python is
# if 30 <= age < 40
if sex == 'female':
    premium = 125
else:
    premium = 131
The question is, how do we put that conditional statement into our
original program? We do so by (1) placing it under the appropriate
if, elif, or else statement and (2) indenting it a proper
number of spaces as follows:
age = int(input('input age: '))
sex = input('input sex: ')
premium = None
if age < 30:
    pass # next handle male or female
elif age < 40:
    # Note, this has been inserted below the appropriate
    # elif clause (corresponding to 30 <= age < 40) and
    # indented four spaces to the right.
    if sex == 'female':
        premium = 125
    else:
        premium = 131
elif age < 50:
    pass # next handle male or female
elif age < 60:
    pass # next handle male or female
else:
    print('Hmm, maybe call an agent?')
print('Annual premium is', premium)
Use this as a starting point to tackle the following:
Exercise: Finish this program with additional nested
ifstatements.Exercise: Develop a flowchart for the completed program.
It is absolutely essential that you understand the indentation used above. The basic structure (with some illustrative comments) is as follows:
# this is the outermost if, so it needs no indentation
if condition_outer:
#234 the nested if is inside the outer if, so indent by 4 spaces
    if condition_inner:
#2345678 this is inside the inner if, so indent another 4 spaces (8 in total)
        print('condition_inner is True')
#234 this else is part of the inner if and must be indented the same amount (4 spaces)
    else:
#2345678 this print is inside the inner else, so indent another 4 spaces (8 in total)
        print('condition_inner is False')
#234 this print is inside the outer if but outside the inner if so indent by 4 spaces
    print('condition_outer is True')
# this else is part of the outer if, so it doesn't need to be indented
else:
#234 this pass is inside the outer else, so indent just 4
    print('condition_outer is False')
Indentation defines the structure of Python code.
Warning: Always, always, always make sure to use correct indentation.
But Do We Need Them?
Nested if statements are useful because they map pretty nicely onto
our own logic for applications like the insurance example above. That
said, all nested if statements can be converted to the
if/elif/else structure (albeit with difficulty in some
cases) by using the logical operators and, or, and not.
For example, consider the following nested conditional:
In [1]:
n = 123
if n > 10:
    if n % 2:
        print(n, " is greater than 10 and odd")
    else:
        print(n, " is greater than 10 and even")
123 is greater than 10 and odd
This is equivalent to
In [2]:
n = 123
if n > 10 and n % 2:
    print(n, " is greater than 10 and odd")
elif n > 10 and not n % 2:
    print(n, " is greater than 10 and even")
123 is greater than 10 and odd
Part of learning programming (and the logic behind it all) is to identify the right approach for the job. Here, both examples are about equal in effort and performance. For other applications, it might be much more work to reduce a multi-level, nested conditional statement to one with fewer levels of nesting.
Debugging
“Everyone knows that debugging is twice as hard as writing the code in the first place. Therefore, if you write the code as cleverly as possible, you are, by definition, not smart enough to debug it.”
-Brian W. Kernighan, from The Elements of Programming Style, 2nd ed.
Bugs
In days of old, when computers were large and quite mechanical, bugs of the living kind were an actual threat that could down a system. Today, the term lives on as the moniker for errors in one’s code. Programming errors can be categorized as syntactical and logical. Syntactical errors result from misuse of a programming language. For instance, the following code results in a Python error:
In [3]:
if True
    print("we forgot our colon!")
  File "<ipython-input-3-1065f57b9b53>", line 1
    if True
           ^
SyntaxError: invalid syntax
Python is interpreted, so it can alert users to errors right away. Here,
it’s reminding us that an if statement needs its colon (it doesn’t
tell us what we’re missing, but it does point to where it thinks we
should look). Were we to have a syntactical error in a compiled language
(e.g., C++), it would never compile in the first place.
Logical errors, on the other hand, can arise in code that is syntactically correct. Consider the following issue:
In [4]:
import numpy as np
# make an array of three numbers
a = np.array([1, 2, 3])
# define be to be 3 times the third element
b = 3*a[3]
---------------------------------------------------------------------------
IndexError                                Traceback (most recent call last)
<ipython-input-4-2eba6176732d> in <module>()
      3 a = np.array([1, 2, 3])
      4 # define be to be 3 times the third element
----> 5 b = 3*a[3]

IndexError: index 3 is out of bounds for axis 0 with size 3
Whoops! Remember that Python is based on zero
indexing, so the
third element should really be a[2] and not a[3]. However,
because a[3] is perfectly valid Python code, the error is one of
logic: we were careless with our index values. Such logical errors can
be really, really tough to figure out because they don’t always lead to
things like IndexError.
The Graphical Debugger
Spyder has a built-in capability for debugging and, along the way, tracing programs graphically. Debugging a program is the art of removing bugs. Tracing a program is the process of walking through its execution line by line, keeping track of all variables along the way. Of course, we already saw that Spyder provides the Variable explorer, which shows the names and values of variables defined after we run a program or execute statements in the console. However, by using the debugger, we can watch, step by step, how those variables change.
Consider the following problem. Given integers a and b, define a
new variable c equal to the sum of the rounded values of a and
b. Here, rounding is to the nearest 10, and we round up if the ones
digit is 5 or greater and down otherwise. For instance, given a = 16
and b = 21, we should have c == 40.
In a mad dash before class, I wrote the following solution:
a = 16
b = 21
if a % 10 > 5:
    a += a % 10
else:
    a - a % 10
if b % 10 > 5:
    b += b % 10
else:
    b -= b % 10
c = a + b
But it fails for a = 16 and b = 21!
Exercise: Run this program and determine the final values ofaandb. If they are not correct, what should they be?
Before we try to identify any of the issues (and there are several), let’s use Spyder and its graphical debugger to trace the program. First, let’s open Spyder and load (or write) the program:
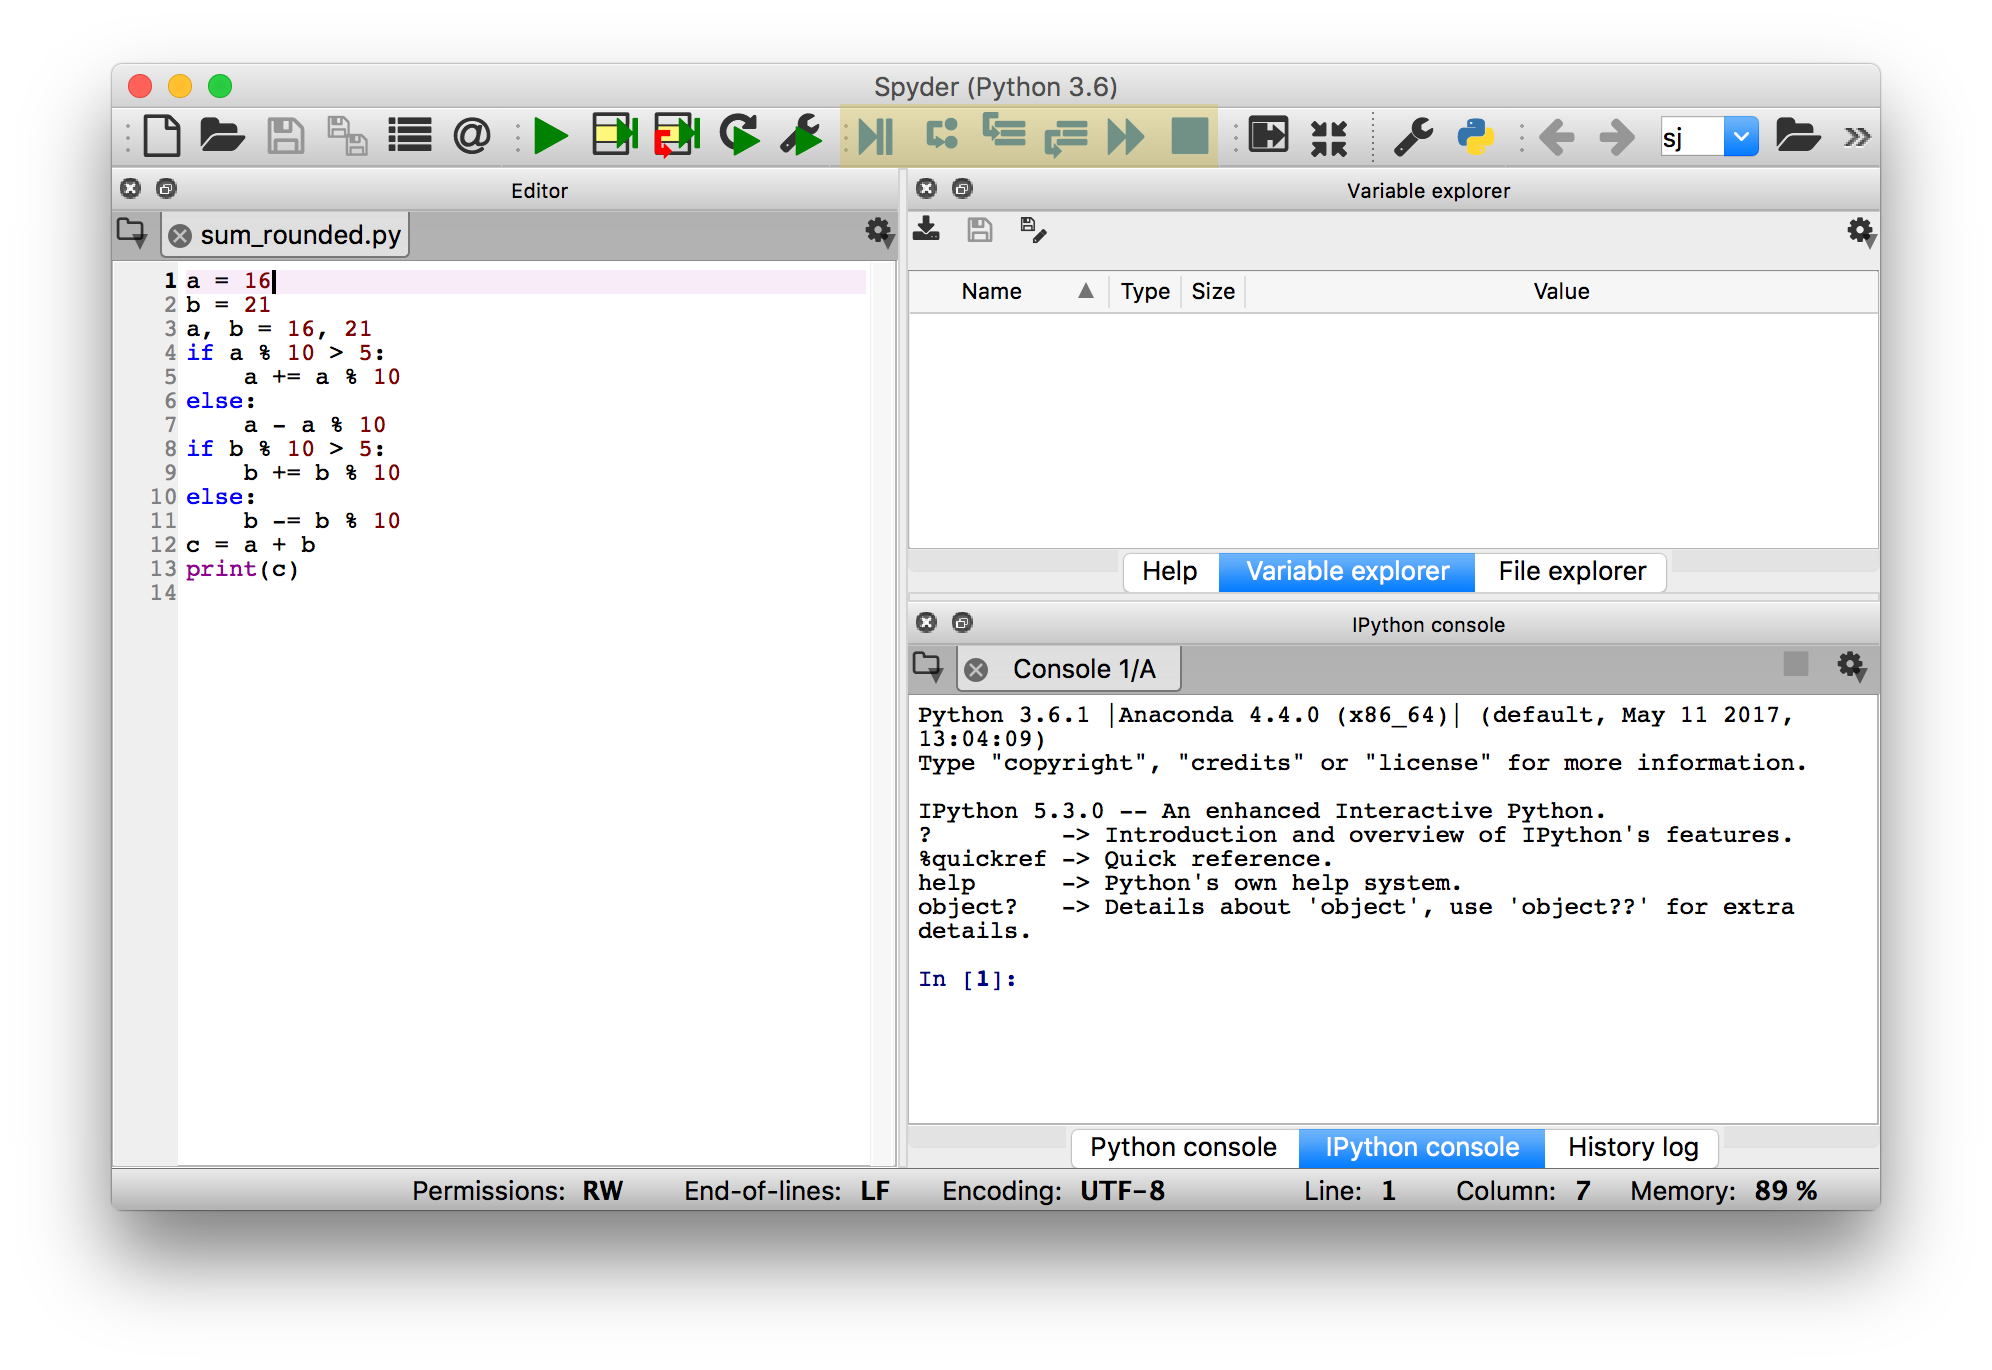
Step 1 - Load the Program
Now, notice that six (blue) icons at the top are highlighted. One can hover over each of these for a brief description of what it does. From left to right, these five icons allow one to
- Debug a file
- Run current line
- Step into function or method of current line
- Run until current method or function returns
- Continue execution until next breakpoint
- Stop debugging
Each of these icons should also have a keyboard shortcut defined for your machine; these shortcuts may prove useful to you.
To begin the debugging process, click on the first of the icons (i.e., the one one that looks like a play and pause symbol joined together). Here’s the output:
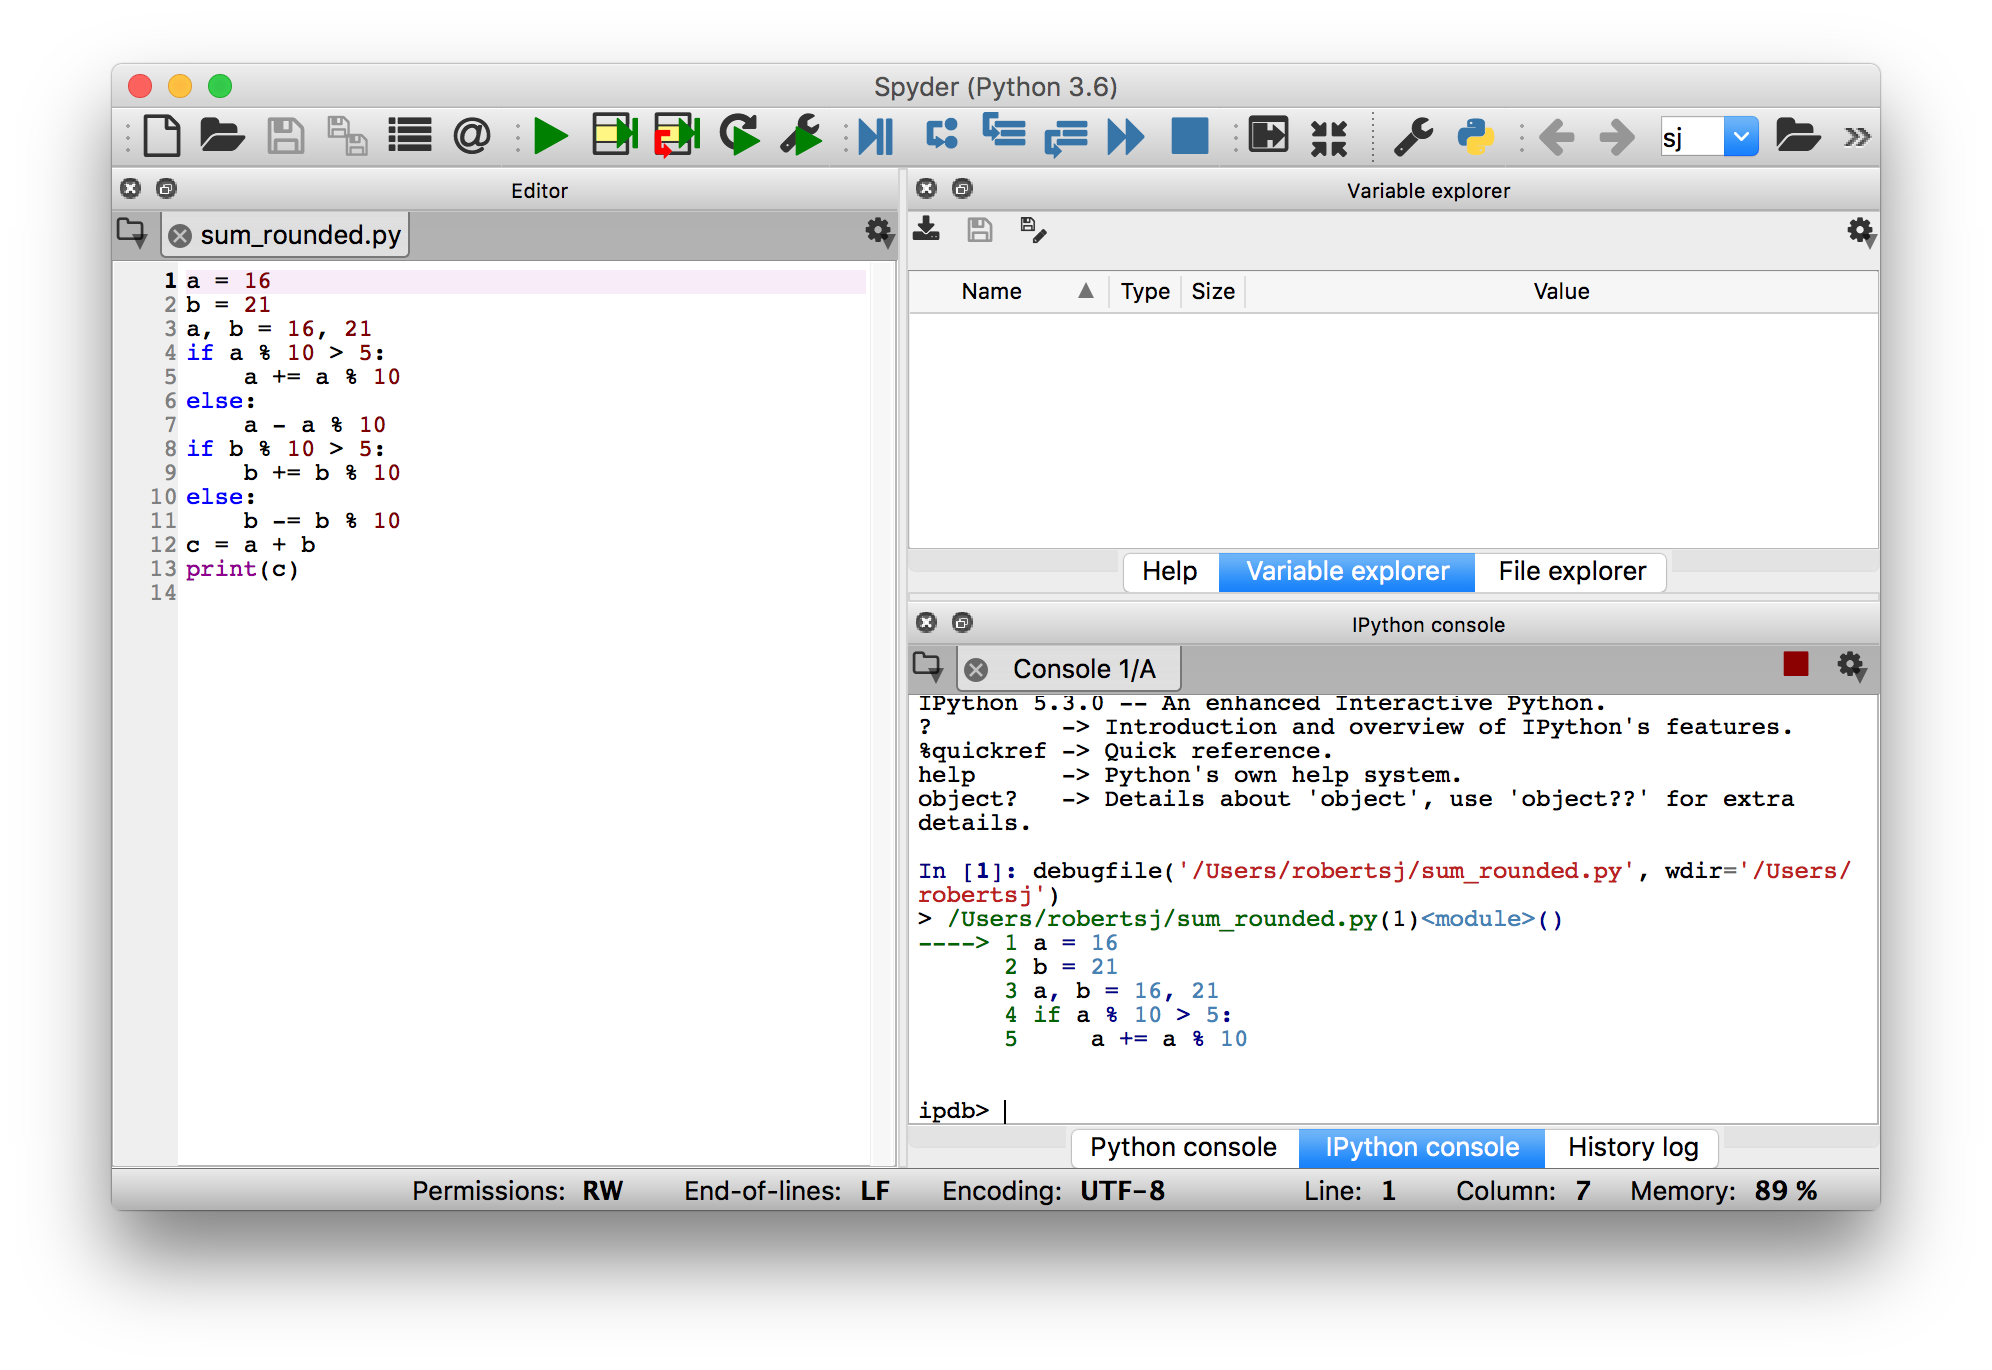
Step 2 - Begin to debug
All the action happened in the console to the lower right. The command
executed is debugfile, and the output is
> /Users/robertsj/sum_rounded.py(1)<module>()
----> 1 a = 16
      2 b = 21
      3 a, b = 16, 21
      4 if a % 10 > 5:
      5     a += a % 10


ipdb>
This output is informative. The program has been loaded, and the
debugger is sitting at the very first line of code (marked here with an
arrow). Further more, the next several lines of code are also provided.
Finally, the console now says ipdb> rather than the default
In [2] we might expect after having already executed In [1].
Here, ipdb stands for the IPython debugger. One can debug right from
within the console using ipdb directly, but we’ll focus on its use
through the graphical interface provided by Spyder.
Next, let’s click on the second blue icon (with an arrow connecting two dots):

Step 3 - Run the first line
By clicking the second icon, we’ve run the line that was last
highlighted (here, line 1), and now line 2 is highlighted. Moreover,
since a is assigned on line 1, its name and value (16) show up
in the variable explorer. Finally, the same 5 lines of code are printed
in the console, with an arrow now pointing to line 2. Note, however,
that line 2 has not yet been executed.
One could continue like this, one line at a time, to trace a program
from start to finish (assuming no errors emerge along the way). However,
sometimes we know where in our program to focus our search for problems.
For a = 16 and b = 21, we know (from the exercise above) that
a is wrong. By setting a breakpoint at line 5 and at line 7, we
can jump immediately to whichever statement is modifying a. To set a
breakpoint in Spyder, one must double click on (or to the left of) the
line number of interest. Here, a breakpoint is set for line 5:

Step 4 - Enable a Breakpoint
If we then click the fifth blue icon (two triangles, i.e., “fast forward), we get the following:
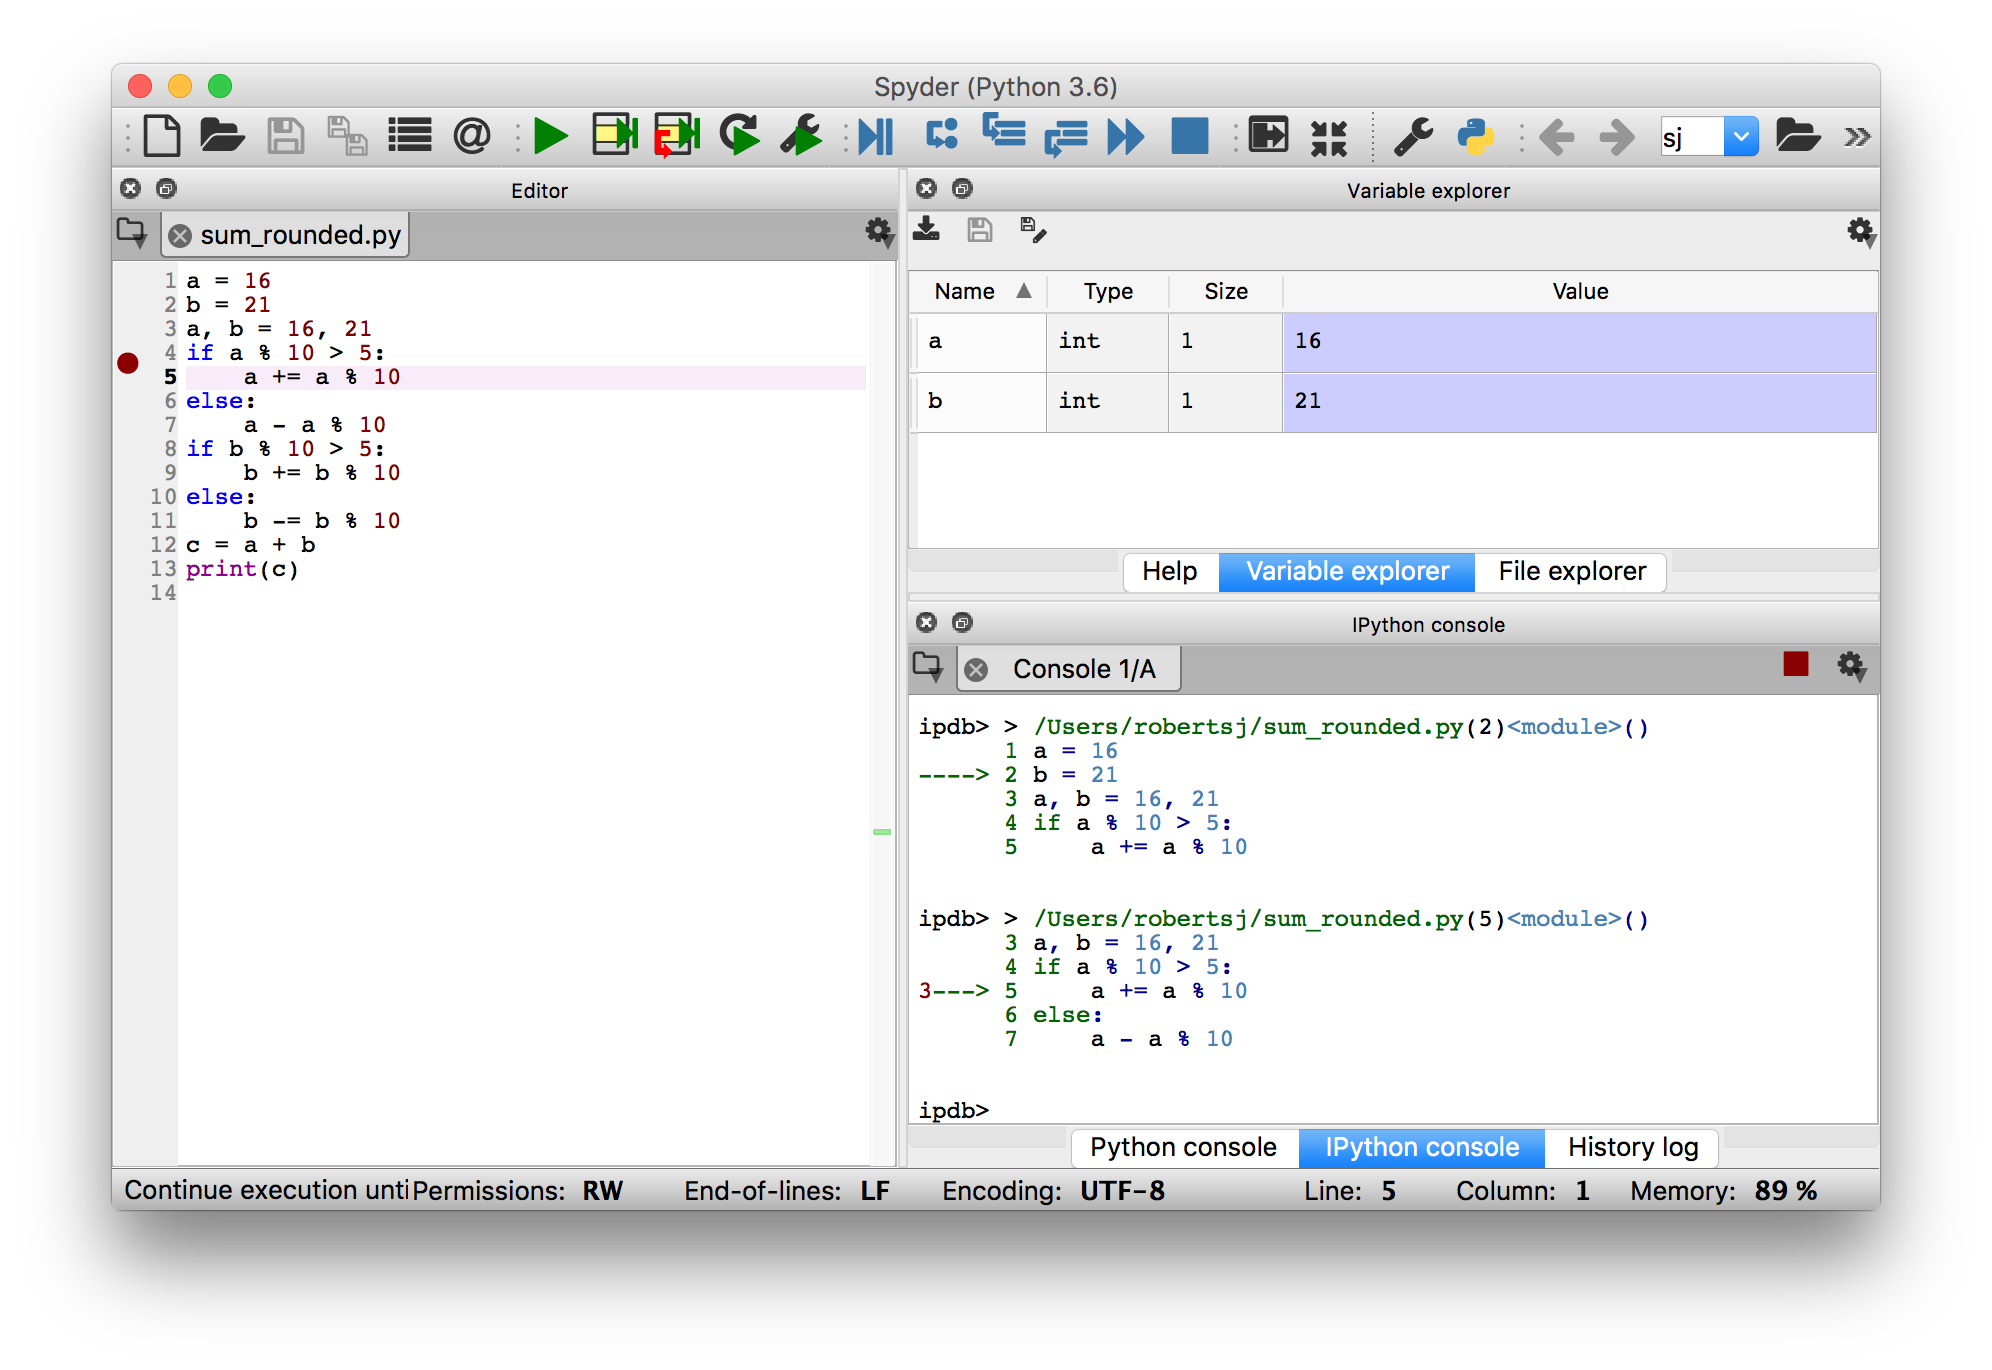
Step 5 - Jump to the Breakpoint
Note that we’ve jumped from line 2 to line 5 in one click (which means
that, as expected, a % 10 > 5 is True). Were this a more complex
program, the jump could be much larger (and lead to much quicker tracing
and debugging).
Now, if we run the current line (line 5), we get:
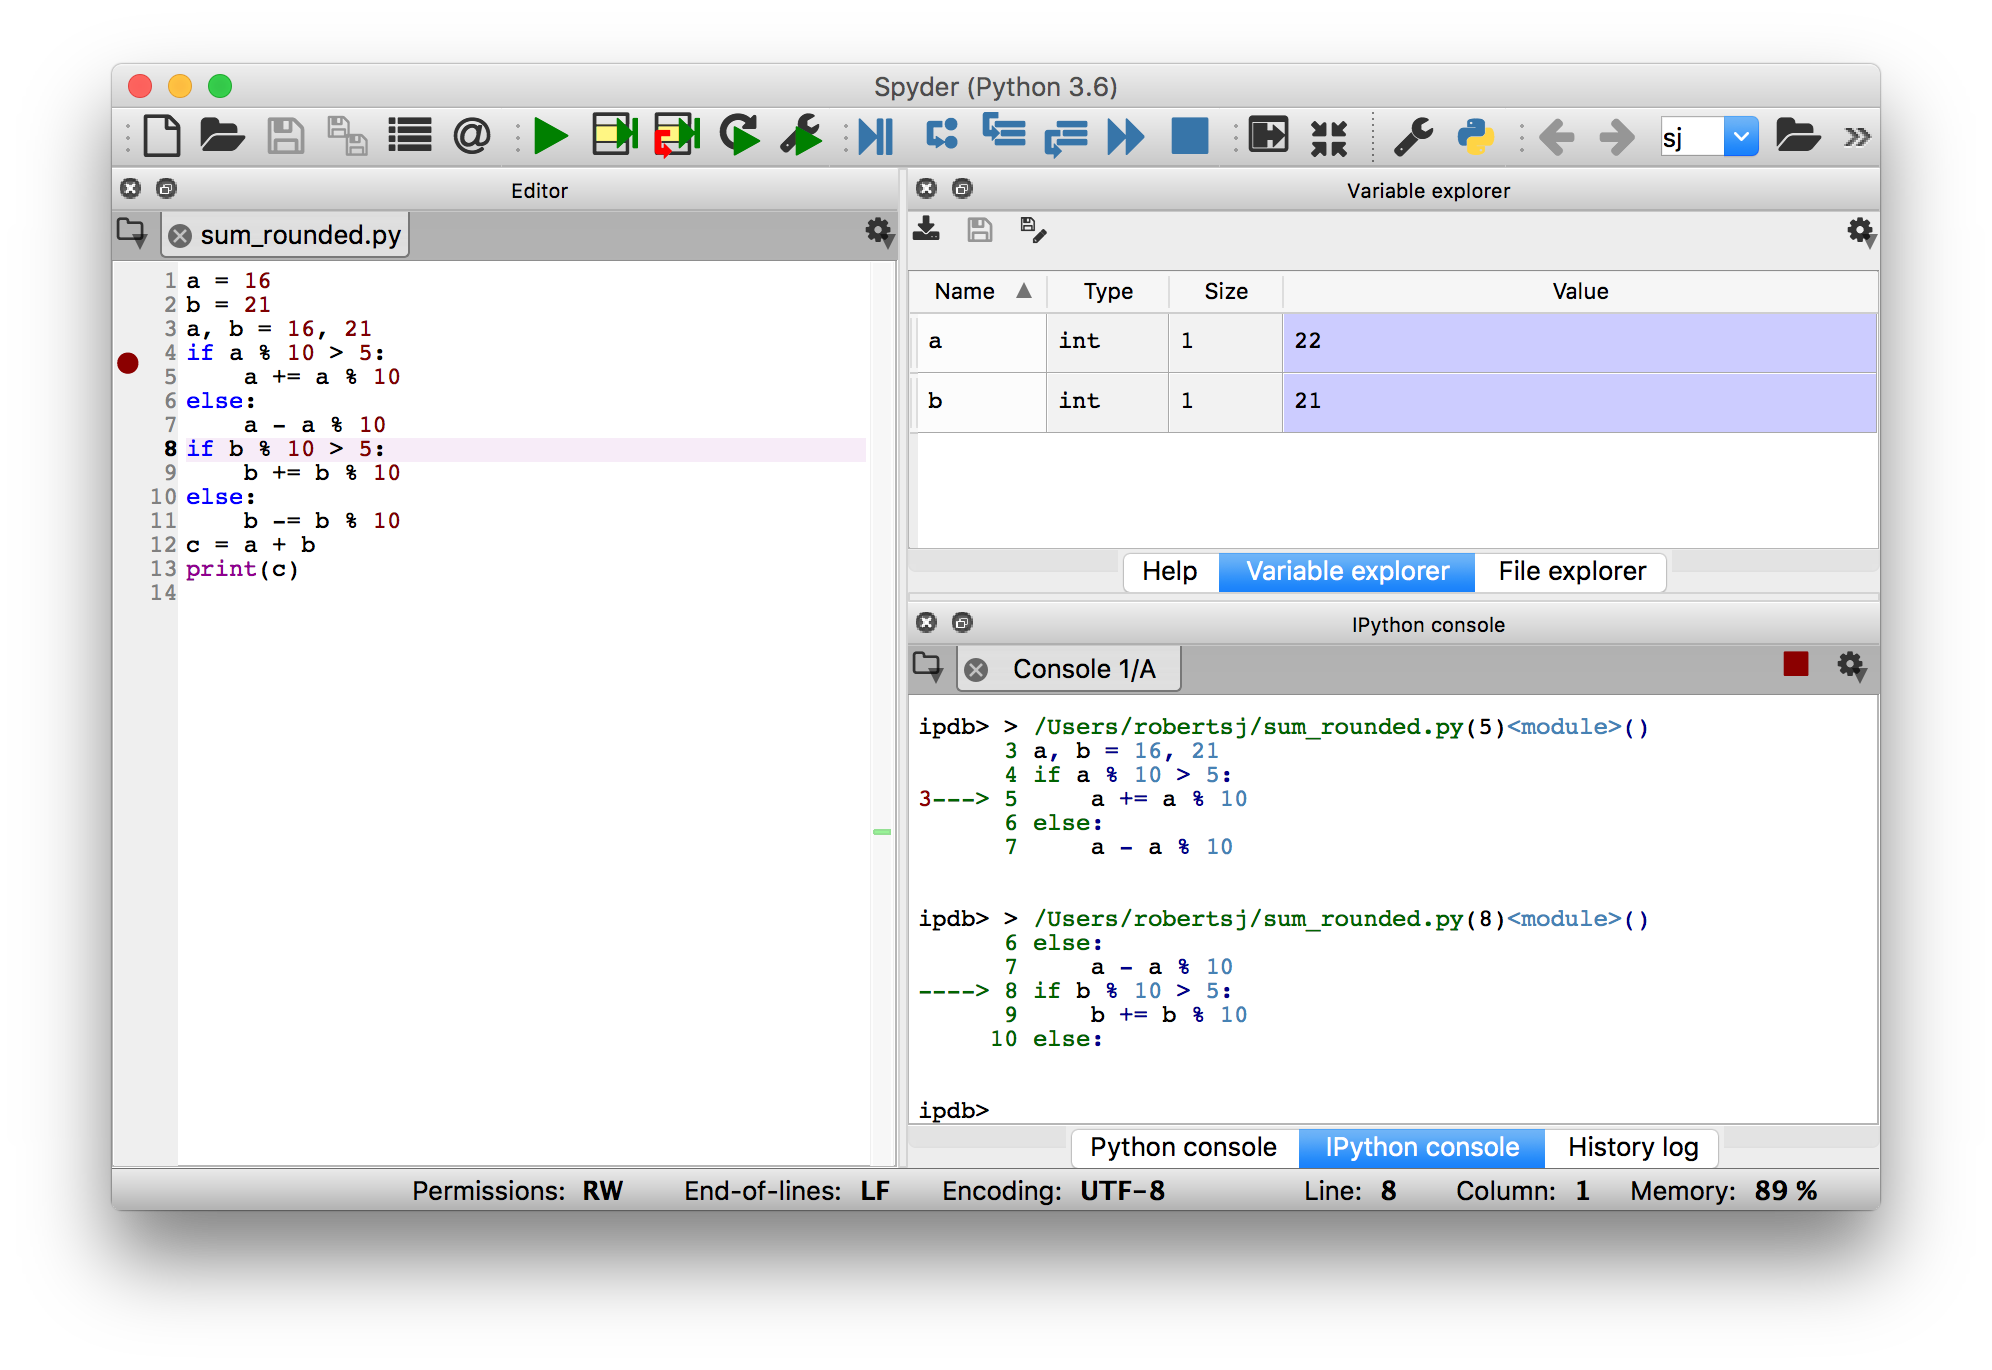
Step 6 - Run the Offending Line
With line 5 executed, the value of a is now 22. That’s not
right! Lines 5, 7, 9, and 11 are supposed to round a and b to
their nearest 10. But we’ve found the location of one bug, and now we
can analyze it in more depth. Let’s break down the logic step by step.
In [5]:
a = 16
a % 10 > 5
Out[5]:
True
Okay, so as we observed, we satisfy the condition of the if on line
4 and move on to line 5.
In [6]:
a % 10
Out[6]:
6
In [7]:
a + a % 10
Out[7]:
22
Wait. If a is 16, then a % 10 is 6. Adding 6 gives us 22 and not
the 20 we expect. While a % 10 picks out the 6 we need to know to
round up, we should add a 4, not a 6, to do that rounding. That 4 comes
from 10 - a % 10:
In [8]:
a + (10 - a % 10)
Out[8]:
20
Now, looking at the rest of the program, there are several, similar errors.
Exercise: Find and fix the remaining bugs in the example program.
Further Reading
For those wishing to learn more about debugging in Python without the
graphical interface, checkout out the pdb
documentation
documentation.